Profiles are custom-built, reusable templates you create. Once you've created a profile, use it to quickly apply updates across all connected listings or create new listings with consistent information.

How to...
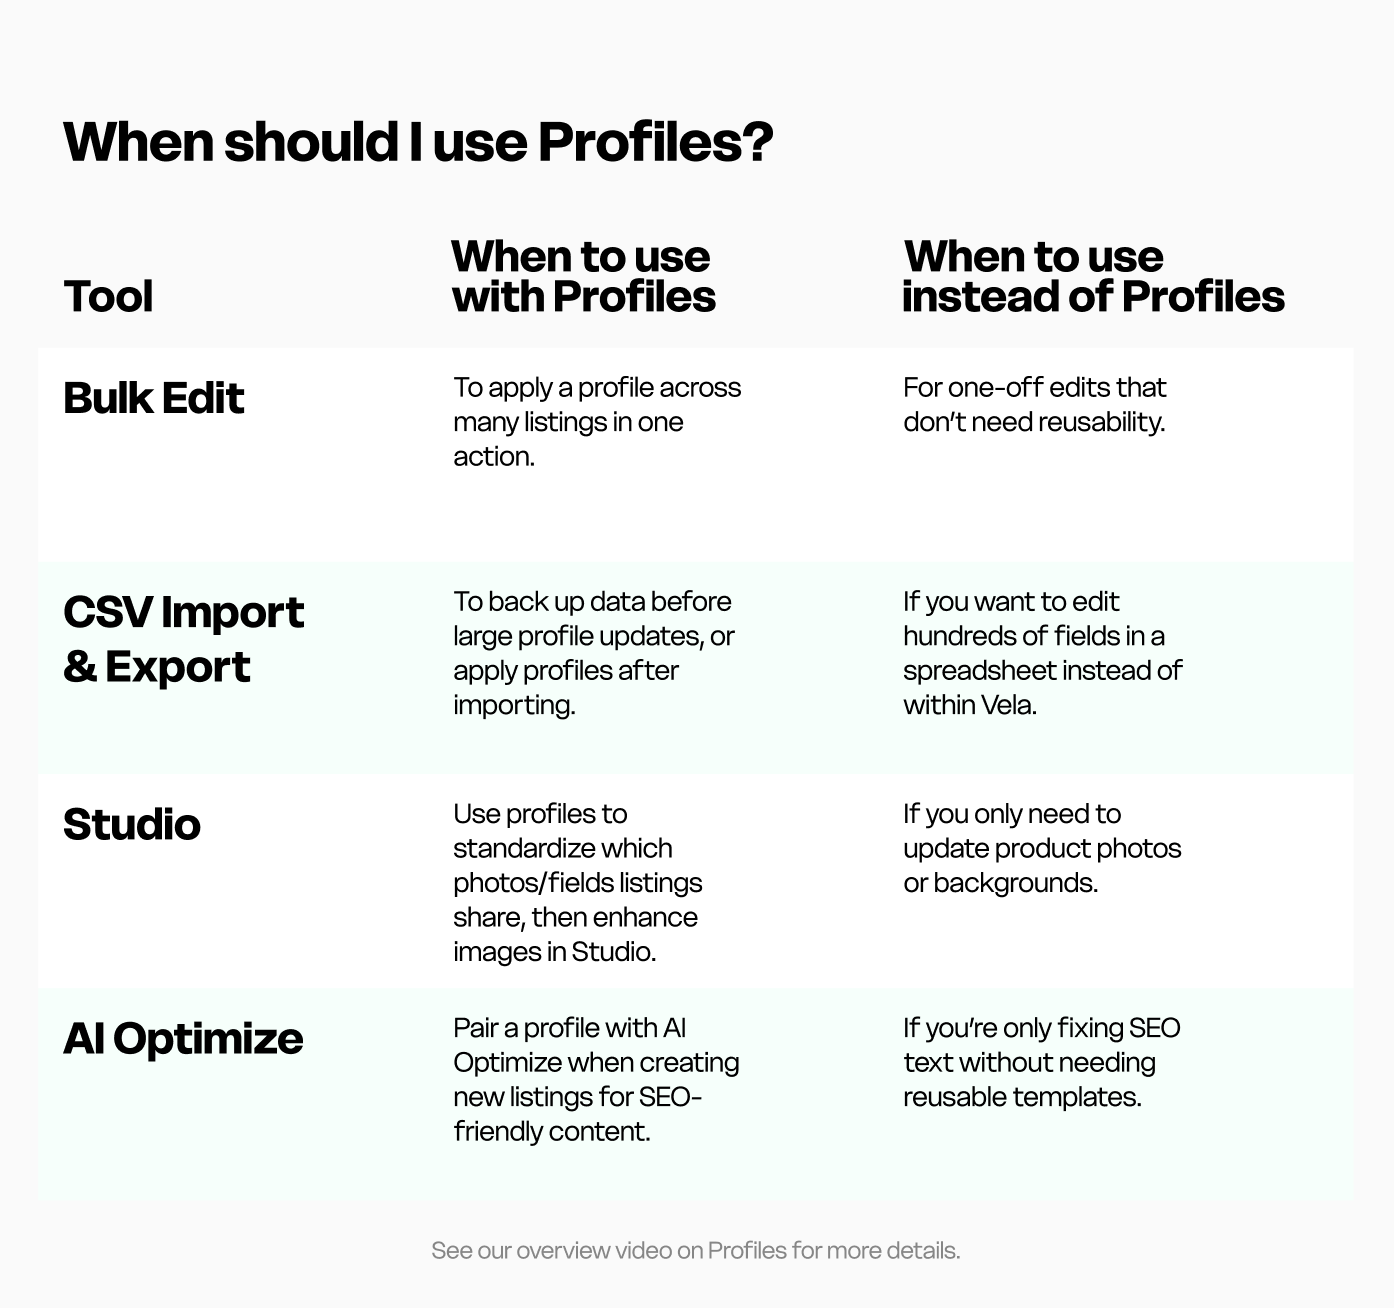
- Know when to use profiles and which Vela tools to use with them
- Understand how profile updates work
- Create and apply a profile
- Retain price, SKU and quantity for variations in a profile
- Use a profile in template mode to create new listings quickly
- Edit a profile
- Copy and delete a profile
- Troubleshooting
1. When to use a profile
2. Understand how profile updates work
Profiles can be created from scratch or saved from an existing listing. They contain sections of listing details that you want to uniformly update and edit across many listings. You can include one or many sections of details in a single profile. Many Vela users manage hundreds of variations with different prices for each across shops with hundreds or thousands of listings by creating profiles and applying them to similar listings. They are also useful for creating many similar listings quickly (read more on template mode in Ch. 5).
Once a profile you have created is connected to or applied to listings, all attributes within that profile (e.g., pricing, tags, variations) instantly replace the existing attributes on connected listings (for information on retaining unique variations prices, SKU and quantities across connected listings for a single profile, see Ch.4 below). When you want to update those fields in the future, you can edit directly in the profile. When you select Save, all connected listings will update automatically.
You can still edit individual listings after applying a profile. However, each time you edit and save the profile, it will overwrite any manually edited information on connected listings.
3. Create and apply a profile
Create a profile from scratch
- Click the profiles icon in the left menu to open your profiles dashboard. Choose Create profile.
- Give your profile a name, and select which listing fields you want to include in the profile. Only choose the fields you want to edit (overwrite) with the profile information. You can add one or many listing fields to the profile.
- Fill those fields with the data you want to overwrite on connected listings. Any fields left blank will erase that information from existing listings when the profile is applied or connected. See Ch. 3 + 4 below for details on advanced applications of profiles.
- Click Save.
Create a profile from an existing listing
- Open the listing you'd like to save as a profile from your main listings dashboard. At the bottom of the screen, select Save as profile. This will not edit or impact the listing you are saving from.
- Give your profile a name, and select which details from this listing you want to include in the profile by checking the boxes. You can add one or many listing fields to the profile.
- Click Save.
Connect listings to a profile
Before connecting listings, be sure that you have all the data in the profile correct, and that you only connect listings which you want to have overwritten by any fields included in the profile. There is no undo or restore once a profile is applied, and changes are reflected immediately in your selling platform.
- From the profiles screen, choose the profile you'd like to work with.
- Click Connect listings.
- Use the filters or search bar to locate the listing(s) you'd like to connect. Select them by clicking the check boxes at left.
- Click Connect ____ listings.
- The information in the profile immediately syncs to those listings in your shop.
Apply a profile in bulk
- From the main listings dashboard, use the check boxes at left to select the listings you'd like the profile applied to.
- Click Edit at top right to open the bulk editor.
- Use the profiles drop-down menu to select the profile you want to apply.
- Review changes by selecting fields where green dots appear, indicating changes have been made.
- Click Sync updates to send changes to your shop.
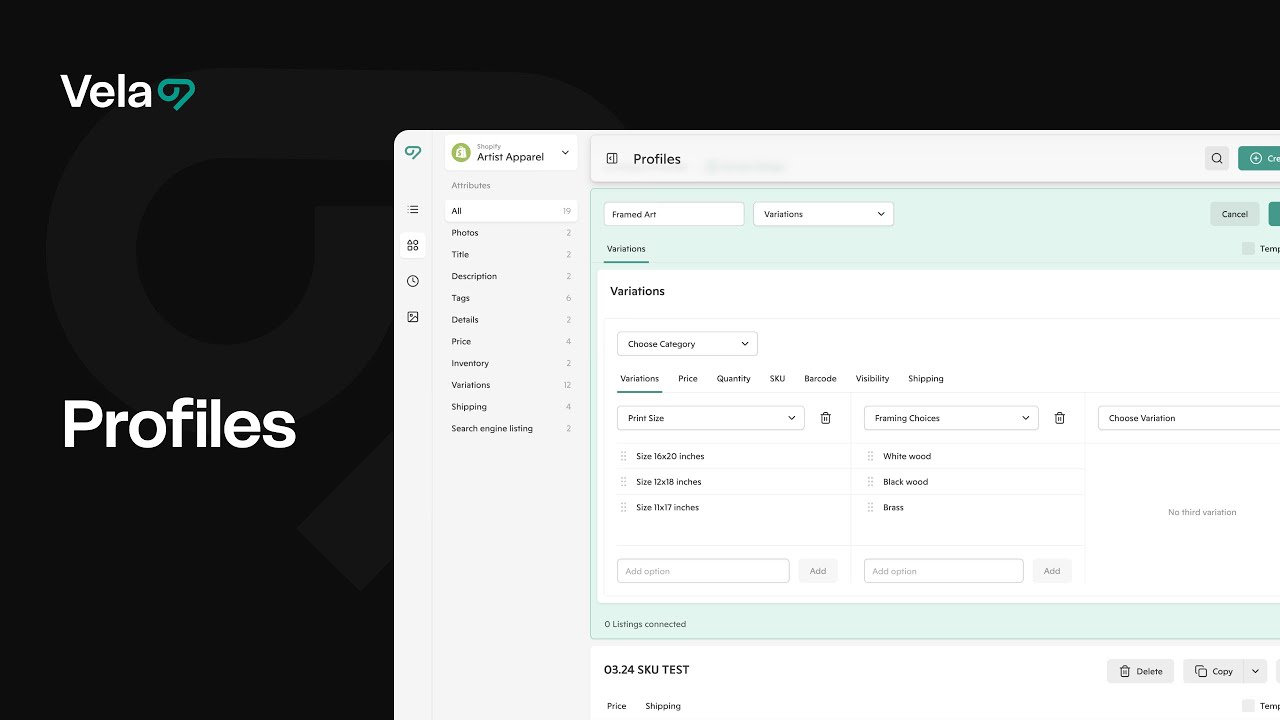
4. Retain prices, quantity and SKUs for profiles with variations
When creating and applying a profile to listings which include prices, quantity and/or SKUs for individual variations, you can choose to retain the unique data existing in each listing when the profile is applied by following these steps.
- Create a profile which has the same variations as the listings you want to connect. You can create the profile by entering details manually or by saving from an existing listing. In either case, variations in the new profile and any listings you will connect to it must match exactly, including:
- Order and placement
- Spelling and punctuation
- All included fields and options
For example, if a listing has Size and Color as its variation options, the profile must have the same options, in the same order.
- Depending on which field(s) you'd like retained as-is in any listings you connect, select Retain prices, Retain SKU, and/or Retain quantity.
- Connect listings (See Ch.2).
- If listings do not connect, check that the variations in the listing(s) and profile match identically, and make any necessary edits, then re-apply.
5. Use a profile in template mode to create new listings quickly
When creating a profile which will only be used to create new listings, you can select Template mode to ensure that future edits to the profile won’t impact the current listing. In template mode, a profile will drop the details contained in the profile into the new listing, but won’t maintain a connection to the listing after that point. You can create unlimited listings using a single template mode profile.
Create a profile in template mode
- Follow the steps to create a new profile from scratch or from an existing listing (see Ch.2 above). Include all fields which the new listings will have in common, which may include shared photos like size and price charts, prices, inventory, variations, shipping profiles, details, etc.
- Fill the relevant fields.
- Check the Template mode box in the top right of the profile.
- Save.
Create a listing using the profile
- Select Create listing from the main dashboard.
- Choose the profile from the drop-down menu.
- Add any photos unique to the new listing, and drag them to the right order.
- Fill the remaining fields manually or using our AI Optimization tools, which will generate optimized title, description and tags based on your photos and listing details.
- Publish or Schedule the listing.
6. Edit a profile
Once you have created a profile and connecting listings to it, future edits to those listings can be made directly in the profile for all included fields.
- Click the profiles icon in the left menu to open your profiles dashboard.
- Locate the profile you want to update and click Edit.
- Make changes to the fields you want to update.
- Save changes. You can choose to:
- Save to the current profile, which will update all connected listings directly on your selling platform, instantly (remember, there is no “undo” or “revert”).
- Save the changes as a new profile.
7. Copy or delete a profile
Deleting a profile
When deleting a profile, listings connected to the profile will retain the details from the most recent profile update. Connected listings will not be deleted or changed.
- Click the profiles icon in the left menu to open your profiles dashboard.
- Select the profile you want to delete.
- Select Delete.
Copying a profile
Profiles can be copied within a shop, across shops, and even to shops on different selling platforms. When you copy a profile, connected listings will not be copied to the new profile.
- Locate the profile you'd like to copy. Click Copy.
- Choose the shop where you want the copied profile to land.
- Open the copied profile and make any changes needed.
- Click Save.
- Connect listings or apply in bulk.
8. Troubleshooting
If your profiles aren’t behaving as expected — not connecting, not syncing, or overwriting data — use the guide below to identify the cause and next steps.
Profile won’t connect to listings
Most connection issues happen when you have chosen to retain certain data for each listing (the boxes for Retain price, SKU, quantity and processing profile are located in the variations section of the profile), and the variations in the listings and the profile don’t match exactly.
To connect successfully:
- Make sure the variation names, order, spelling, punctuation, and included options in your profile and listings are identical.
- Always connect listings before making additional edits that change the variation structure of that profile when Retain is selected, for example, when you want to add options to one of the variations.
- If you did not intend to retain prices, SKUs, or quantities, uncheck the corresponding Retain boxes in the Variations tab of the profile before connecting.
If the variations don’t match, listings won’t connect — adjust them to match exactly, then retry.
Learn more: Profiles Overview
Changes don’t appear in my shop
If updates appear in Vela but not on your sales channel:
- Allow time for marketplace syncing — large updates (especially those with hundreds of listings or many images and/or variations) can take time to reflect in your shop.
- For best performance, keep Profiles connected to fewer than 500 listings at a time.
If a profile has 20 or more variations per listing, divide it into smaller profiles - we recommend 200-300 listings for profiles with extensive variation lists. - When many listings are updated at once, your connected marketplace may delay the changes while it processes existing ones.
If this happens, wait 24 hours to allow updates to finish processing in the background. Then, retry any listings that didn’t update, keeping the batch to 500 or fewer listings. - Click Refresh Shop from your main listings page to confirm changes applied within Vela.
- If you have domestic and global pricing enabled on Etsy, updates won’t apply until that feature is disabled for those listings directly in your Etsy shop (as soon as we're able to support Domestic + Global pricing, we'll let you know!).
- If it’s been more than 24 hours and updates still don’t appear, or the sync is taking a long time for a small update, contact us through the chat window at bottom right of your dashboard, and we'll investigate.
Changes appeared, then reverted
If your profile changes appear and later revert, it’s usually because you made manual edits to listings after applying a profile.
When you save that profile again, it overwrites all included fields — replacing those manual updates.
To avoid this:
- Only edit listings manually for fields not included in the connected profile.
- If you want to create listings using the profile but don’t want future profile edits to affect them, use Template Mode. Template profiles fill in details when creating listings but do not stay connected afterward.
Learn more: Template Mode
Profile deleted information from my listings
When you apply a Profile, all attributes contained within that Profile replace the existing attributes on the connected listings. This ensures consistency but can overwrite details that were entered manually.
If your listing data was replaced unexpectedly, don’t worry — your listings themselves are still intact, and the information can be restored.
To restore overwritten information:
- Disconnect the listing(s) from the profile
- Re-enter details manually in Bulk Edit, or
- Reimport your last exported CSV to restore previous data, or
- Copy from a similar listing that still has the correct information.
To prevent this from happening in the future:
- Review your Profile fields before connecting or reapplying to confirm which attributes are included.
- Only add fields you actively want to overwrite - blank fields will erase data when applied.
- Export your listings to CSV before applying Profiles to a large group — this creates a backup you can restore if needed.
Tip: If you plan to make frequent changes to listings that also need unique edits, consider using Bulk Edit for one-time adjustments and Profiles only for consistent, shared details.