CSV Import + Export lets you edit and create listings in a spreadsheet, then bring them back into Vela. It’s a powerful way to make large-scale updates or create many new listings quickly.

How to...
- Export listings
- Edit and import existing listings
- Edit variations in CSV
- Add or replace photos, videos, and digital files
- Create and import new listings using a CSV
- Troubleshoot CSV imports
1. Export listings
- From Listings, select the listings you want to export.
- Click Export and confirm your email address.
- You’ll receive an email from Vela with a download link. Click the link to download the CSV file.
- Open the CSV in your preferred spreadsheet editor such as Google Sheets, Excel, or Numbers.
- Each listing appears as a set of rows—one for the main listing, and additional rows for each variation combination.
- The first column (Listing ID) identifies existing listings. Do not change it when editing existing listings.
- Save a backup copy before making any changes.
2) Edit and import existing listings
- Open your CSV in a spreadsheet editor such as Google Sheets, Excel, or Numbers.
- Each listing appears as a set of rows—one for the main listing, and additional rows for each variation combination. Each listing field that can be edited via CSV is included as a column.
- Keep Listing ID exactly the same for listings you’re updating.
- Make edits into the desired fields.
- Descriptions can be pasted with formatting, spacing, and emojis if your platform allows.
- Separate multiple tags, materials, or categories with commas inside a single cell.
- Use formulas and find/replace to make edits faster across many listings.
- See Ch 3 and 4 below for details on editing variations and media files via CSV.
- Descriptions can be pasted with formatting, spacing, and emojis if your platform allows.
- Avoid deleting columns you don’t plan to edit—simply leave them untouched.
- Save your updated file as a CSV.
- In Vela, click Import and upload the file.
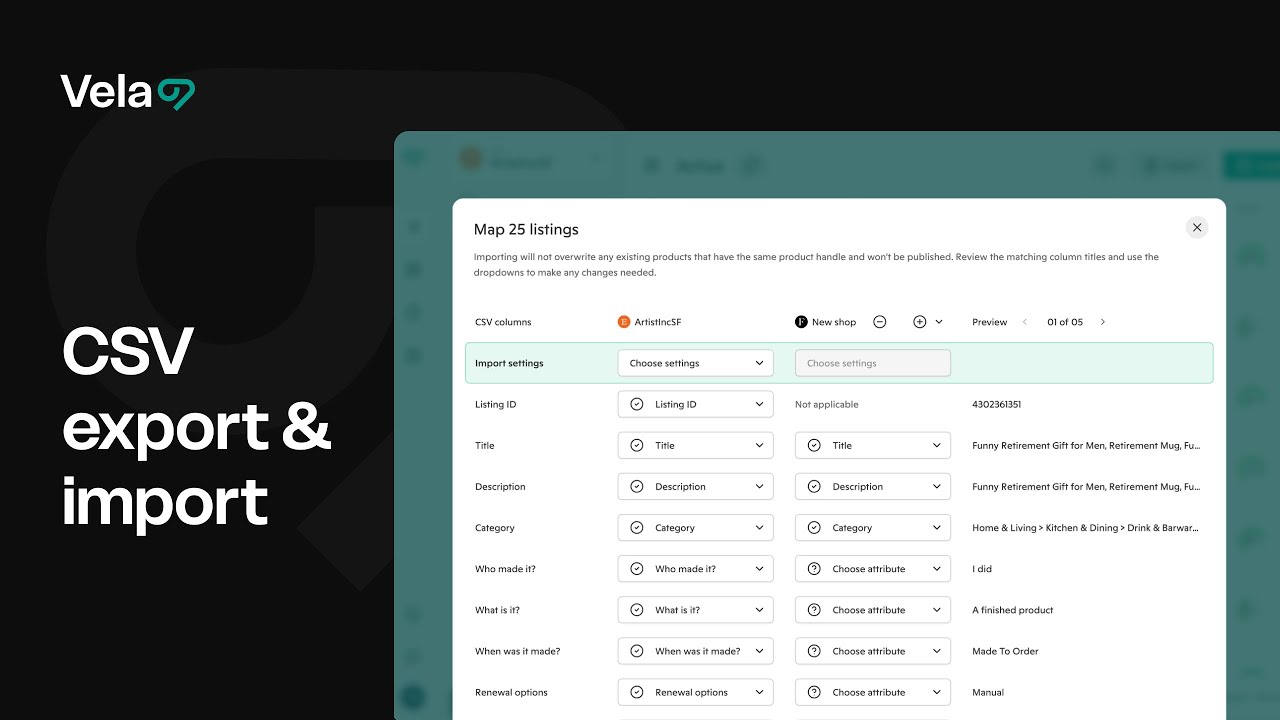
- In the Mapping wizard, verify that each column is mapped correctly to its listing field. Use Do not import for any column you didn’t modify.
- (Optional) Add the updated listings as new additions to connected shops by selecting them at the top of the Mapping wizard and reviewing each mapping.
- Click Import listings.
- Review results in Imported → Existing listings. Each listing will have a status indicator showing whether it’s ready to publish or needs attention.
- Green: Listing imported successfully and is ready to publish.
- Red: Listing needs more information before it can be published (for example, missing title, price, or invalid variation data).
- Listings marked in red display an error banner describing what’s missing or invalid.
- To resolve these, open the listing directly from Imported and complete the missing fields manually, apply a Profile, or re-upload a corrected CSV.
- Once all required fields are complete, the indicator automatically changes to green. Click Sync updates, Publish, or Schedule to complete.
3) Edit variations in CSV
- Each variation combination appears as a separate row underneath its main listing. The main listing row contains the Listing ID, title, description, and tags.
- Variation rows include variation options (such as Size or Color) and their individual attributes like price, quantity, and SKU.
- The variation title (for example, “Size”) repeats for each variation option.
- To update variation-specific pricing, quantity, or SKUs, make edits directly within those rows—leave product-level pricing, inventory and/or SKU blank when these fields are defined by individual variations.
- Ensure that all variations have consistent formatting, spelling, and order across rows.
- Save as CSV before reimporting.
4) Add or replace photos, videos, and digital files
- In your CSV, locate the columns for media links (photos, videos, and digital files).
- Add direct URLs that point to the file itself, including the file extension (for example:
https://.../image.png,https://.../video.mp4,https://.../file.pdf). These differ from share links - when you click on a direct download link, it instantly downloads the file to your computer with no additional steps needed. - To create a direct-download link, you can use an image hosting site like Cloudinary, Imgur, or other direct-link CDN providers.
- Files must adhere to any platform requirements for image size and file type
- To replace media, remove the old URL and paste the new one into the same cell. To delete media, clear the cell entirely.
- Save your CSV and Import it back into Vela.
5) Create and import new listings using a CSV
- From the main listings view, click Import and select Download CSV template. You can also add new listings to an exported CSV of existing listings by adding lines to the file and leaving the Listing ID blank for new items.
- Open the template and fill in all required fields for each new listing. Leave
- Separate tags, materials, and categories with commas inside each cell.
- Add one row for every variation combination. Include price, quantity, and SKU per variation row.
- Add direct links for photos, videos, and digital files (including file extensions). See Ch. 4 for more detail.
- Save the spreadsheet as a CSV file.
- In Vela, select Import, upload the file, and confirm mappings in the Mapping wizard.
- If desired, select additional shops to import into.
- Click Import listings.
- Review new items under Imported → New listings. Status indicators will appear next to each imported listing:
- Green: Listing is complete and ready to publish.
- Red: Listing needs more information before it can be published.
- Listings with red indicators must be completed before they can be published. Once complete, the indicator will automatically update to green. Click into the listing to edit individually, or use Bulk edit and Profiles to quickly correct groups of listings.
- Publish or Schedule the new listings when ready.
6) Troubleshoot CSV imports
- Images do not appear: Media URLs must be direct download links and end in valid extensions (.jpg, .png, .mp4, .pdf).
- Personalization details, optional fields and Processing Profiles do not appear for an Etsy shop: These fields are not supported for CSV import and can be added in the bulk editor before publishing.
- Certain listings do not import: Check titles, tags and description fields for extra spaces, special characters, and other errors.
- Existing listings import into the New Listing tab: Confirm that listing IDs have been included and not altered from the initial export.
- Numbers and leading zeros: Format SKU and ID columns as text to preserve leading zeros.
- File size: Split very large CSVs into smaller groups (500 listings or less) if you encounter upload limits or delays.
- Undo: Once imported and synced, changes cannot be undone. Always review your Imported section before publishing, and keep a backup of your CSV file.